Product Guide

DrivT is a web-based test management tool designed for efficient use by testers, developers, and team leads. It helps them manage, track, and organize software testing efforts. With DrivT, team members can create test cases, manage test runs, and track their results in a modern and clean web interface.
We wrote this guide to make your start in working with DrivT easier. Here you will learn the basics of test management, from creating projects and test running to evaluating real-time results. We highly recommend forwarding the guide to all of your team members to provide a common understanding of test processes.
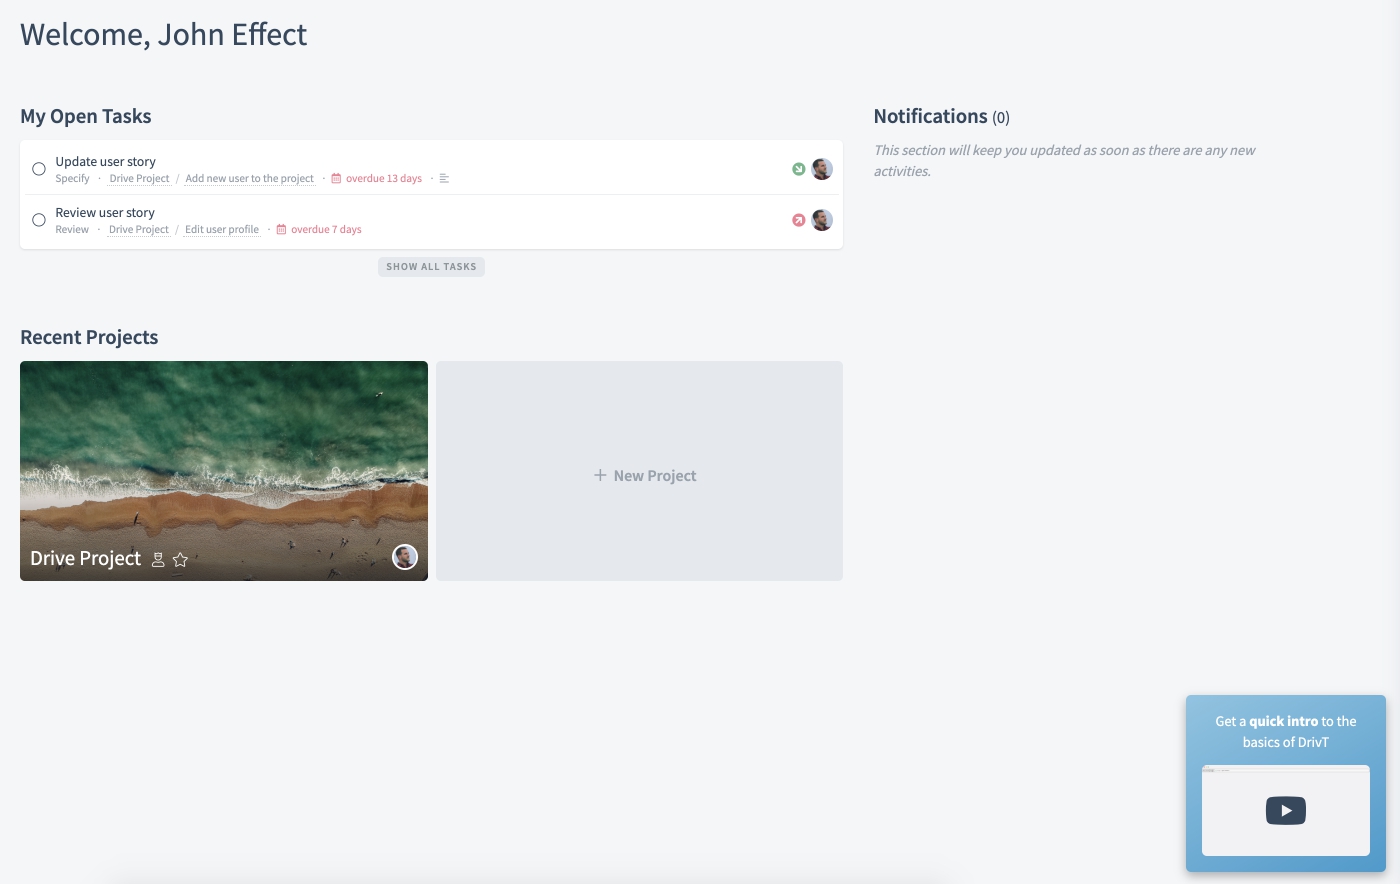
After logging in to DrivT, the first page you always see is the Home Page. The home page provides an overview of recent projects, notifications on recent project activities, and your tasks.
Whenever you want to switch to another project, click on a project title in the upper left corner or return to the home page. To create a new project, click on New Project below the recent projects on the home page and follow further instructions.
After navigating to a project (click on a project title), you switch to the project view and land on the project’s overview page. Here you will find project details such as test cases, defects, requirements, and settings.
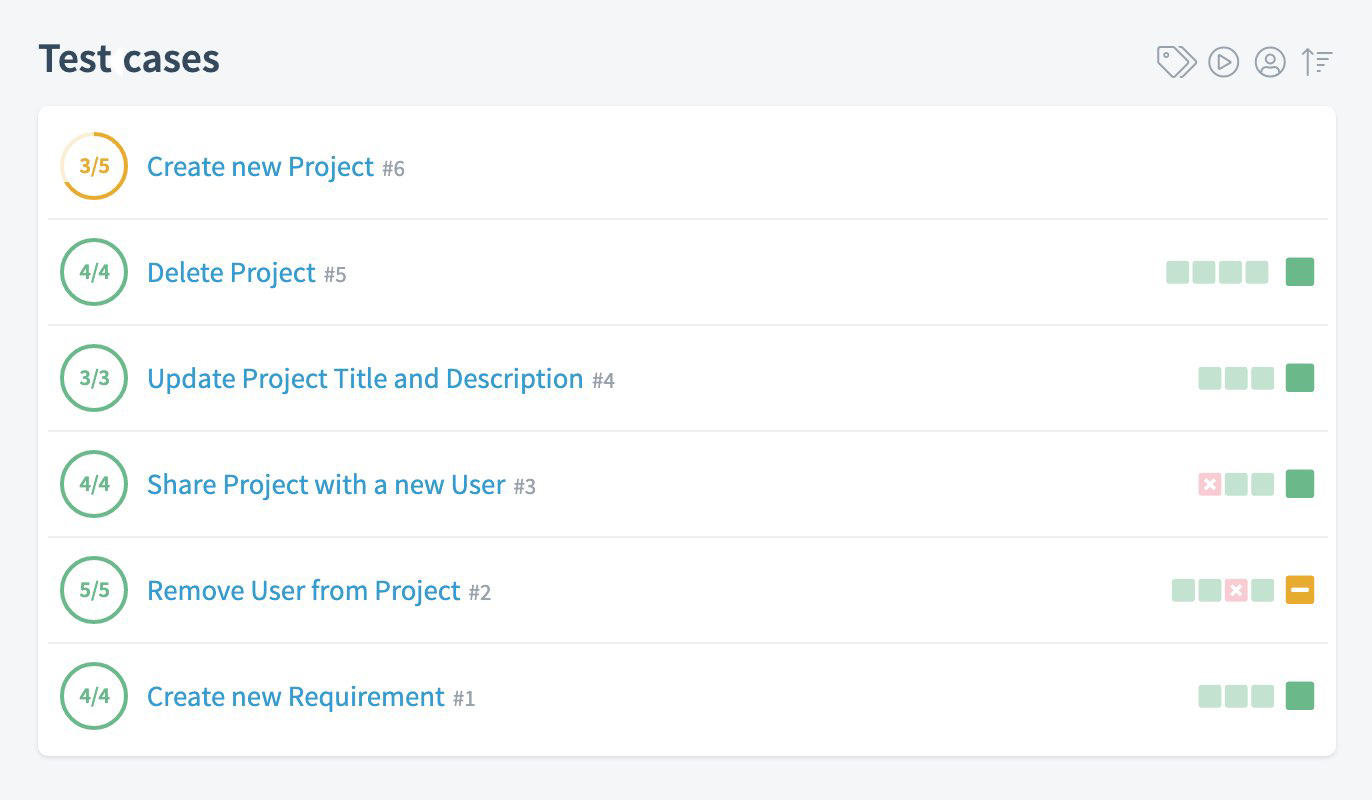
To switch to test cases, click on the icon Test cases below a project title on the project’s overview page. Here you should create test cases depending on requirements.
On this page, you can see four project elements before project details:
- Test cases, which shows the whole number of test cases and the number of test cases with open tasks.
- Test executions, which shows the number of test executions and their success rate in percentage.
- Recent test executions, which shows the number of recent test executions and their success rate in percentage.
- Top task types, which shows the main types of tasks your team is working on.
On the right side of project elements, you can see the increased or decreased percentage, which represents how the work on a project is going on after making the last changes (for example, Test Executions + 2,5%).
Below on the left side, you can see the list of active test cases. You can find the needed test cases by using a filter. Also, you can see when the last changes to test cases were made. For your convenience, we provide the test cases status with colors:
- Green – a test case is completed.
- Yellow – a test case is in progress.
By clicking on any of them, you can learn more about its content. A test case in DrivT consists of a project summary, dependencies, attachments, test steps, and test execution. A single tester can verify a test case in a short time, confirm a specific functionality, document a task, or verify project artifacts.
To minimize the clutter of test cases and storing of irrelevant items, there are labels in place. Adding the labels (tags) and applying them as a filter option, helps to speed up the search for the needed items or create a test run.
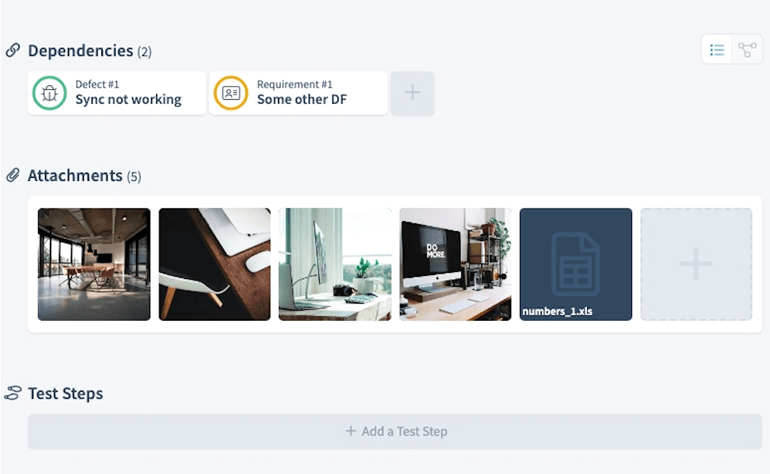
To switch to Dependencies, click on the needed test case on the Test cases page. You can see Dependencies below a project summary. We recommend using labels or putting dependencies to make your work in DrivT more efficient and transparent. As dependencies, you can pin a link to a specific requirement or defect. Below you can see attachments to a test case. You can also upload or download the needed files.
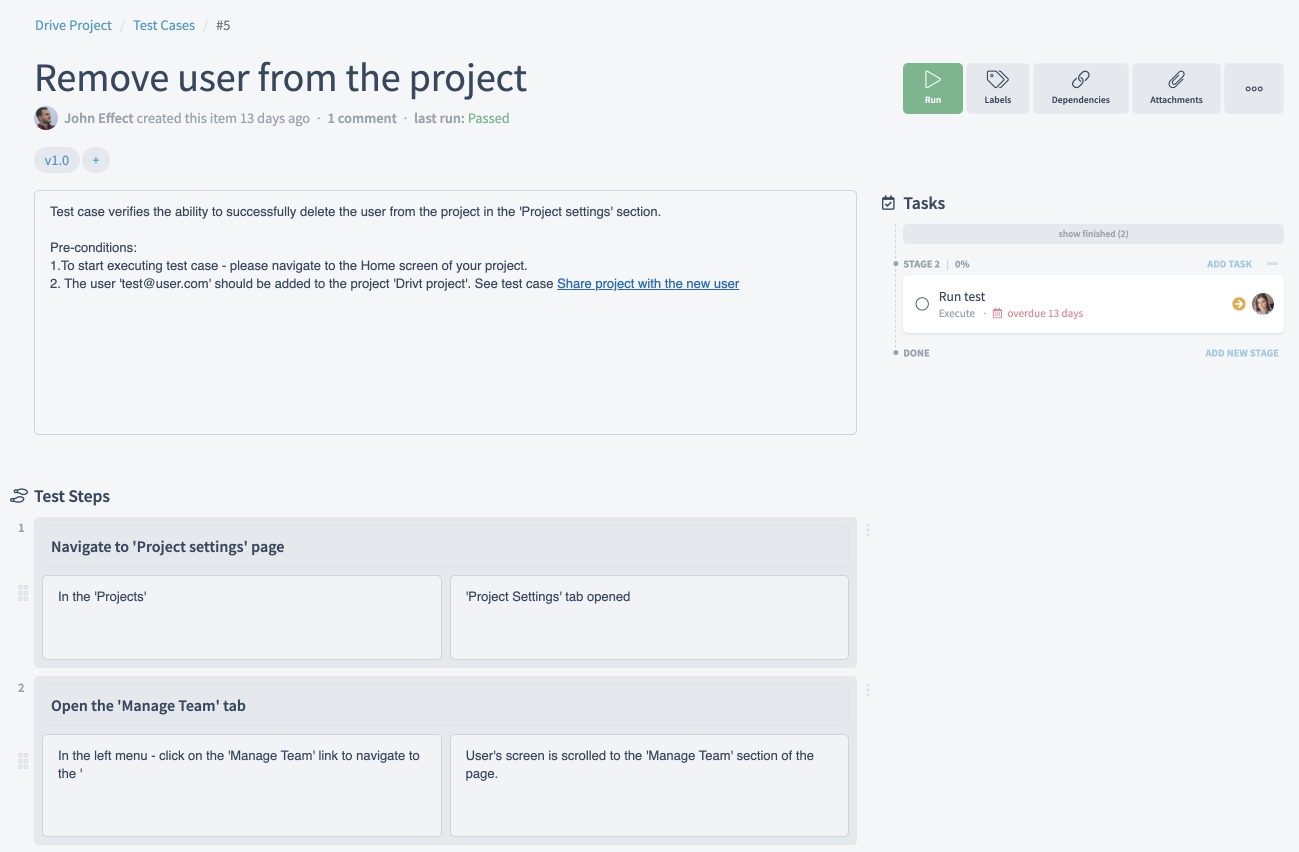
To switch to Test steps, click on the needed test case on the Test cases page. You can see the Test Steps below attachments. To create a test step, click on the button Add a Test Step. Here you should provide a detailed description that will guide your test run.
Below you can find a Test Execution table which shows previous test executions, their dates, runners, and status (for example: Failed, Blocked, Success).
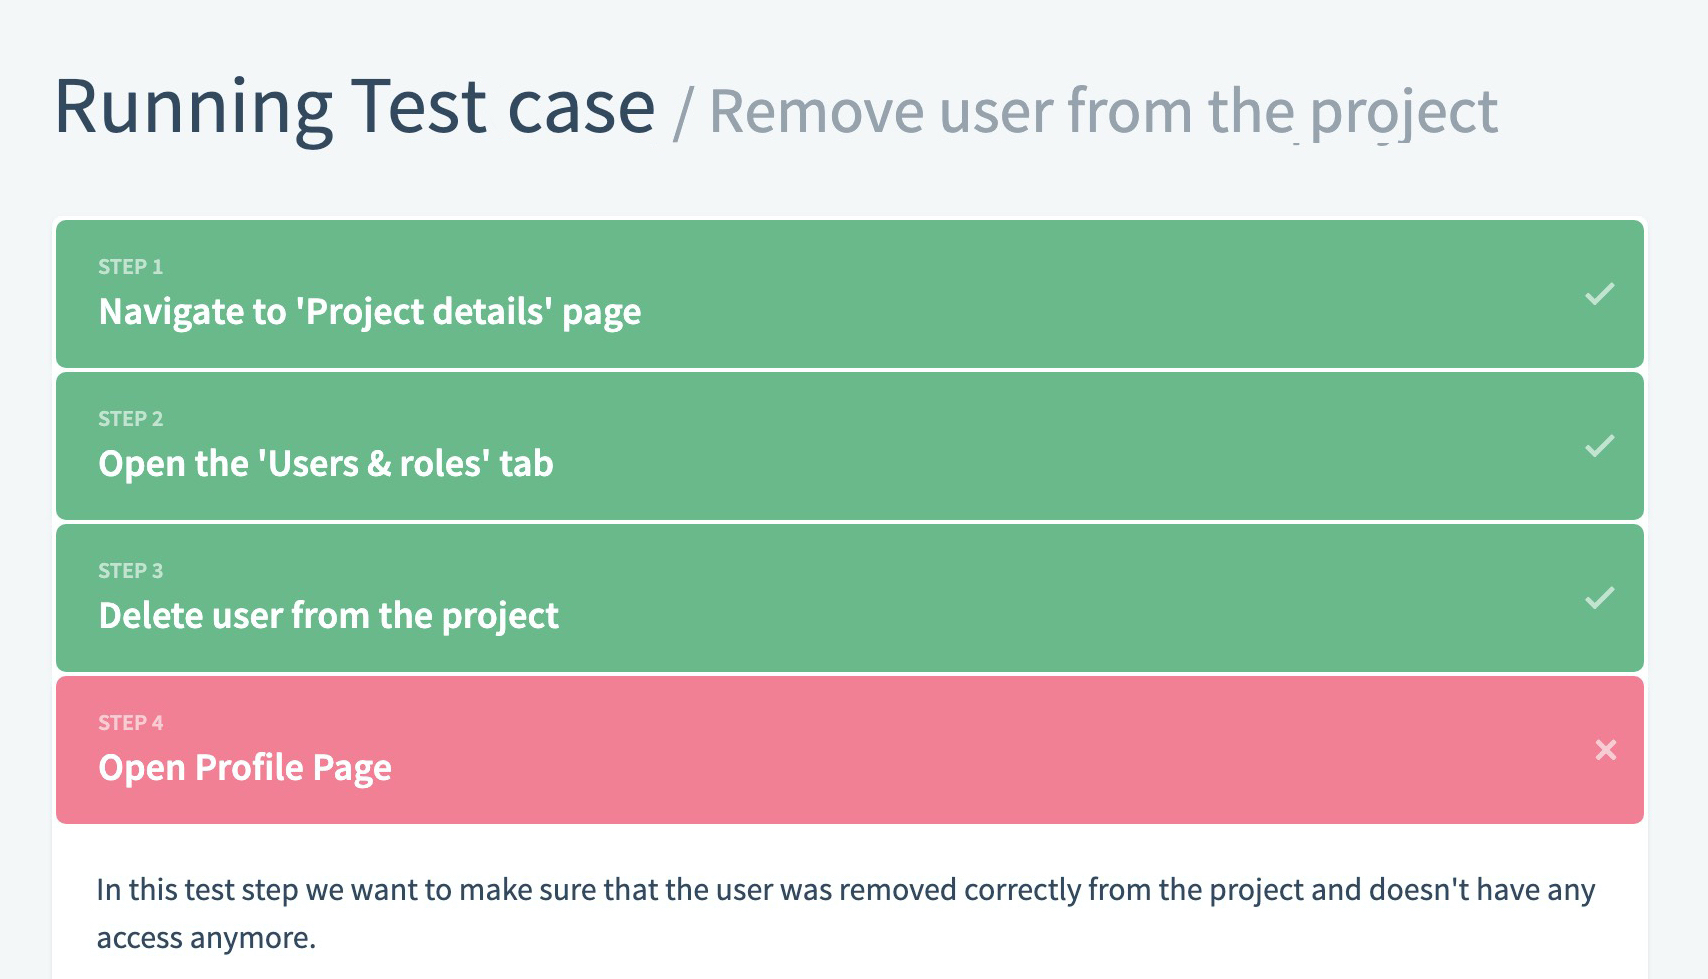
To switch to Test run, click on the needed test case on the Test cases page. To start a test run, click on the button Run in the upper right corner. Here a Tester can see defined test steps, make testing, mark successful tasks, or identify defects.
By default, there can be one of the three different statuses for each test:
- Success – A test is marked as Success when a tester could verify the test steps and all expected results.
- Failed – A test is marked as Failed when one of the defined test steps led to an error or when the expected results differ from the actual test results.
- Blocked – A test is marked as Blocked when it cannot be run currently due to some external dependency (like a bug that must be fixed before completing a test).
Once you complete a test run, you should close it from the test run’s edit page. You cannot edit or change tests of a closed run, which makes it ideal to archive test runs.
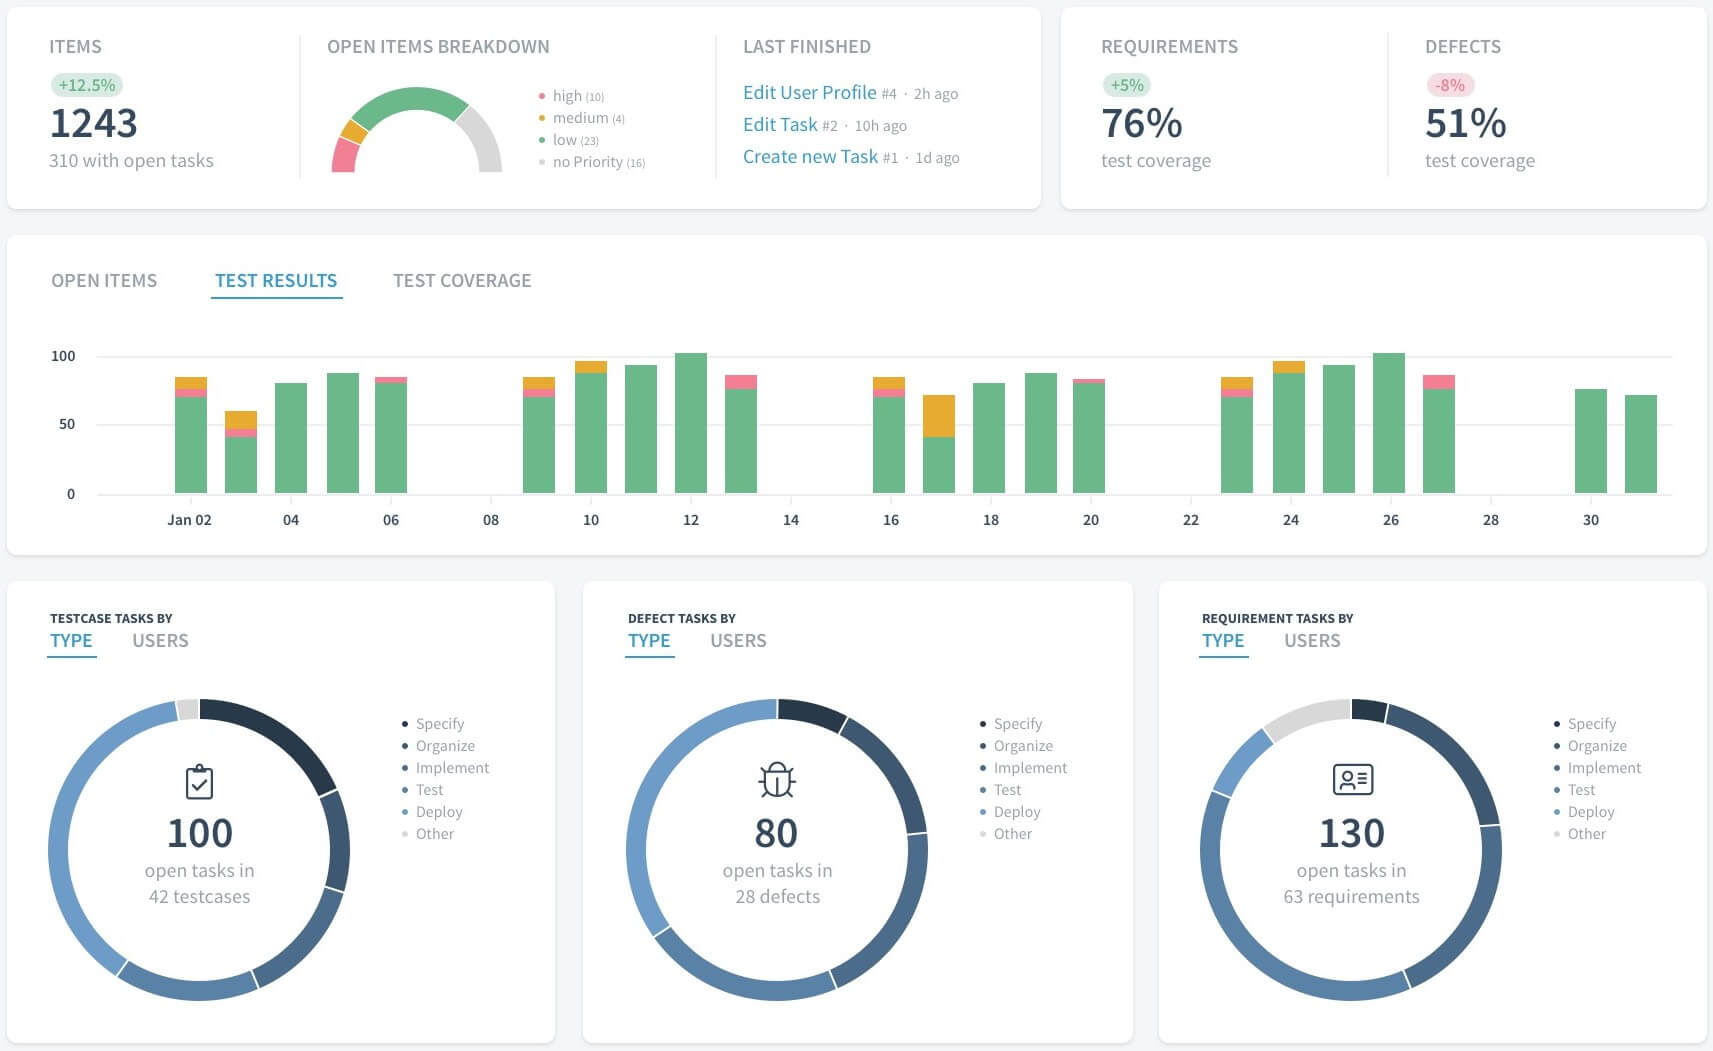
You can use Overview for analyzing particular metrics and infographics which will help you manage your testing more efficiently and make decisions to improve the quality of your software. Besides making it easier to execute test cases and get test results, the overview provides a simple way for all team members to track the progress of your project.
Here you can see several critical elements that represent your progress:
- Tickets, which shows the whole number of tickets and the number of tickets with open tasks.
- Open ticket breakdown (by priorities).
- Last finished tasks and the time when they were completed.
- Test coverage, which shows the average percentage of test coverage in the last 30 days.
- Test executions, which shows the number of test executions in the last 30 days.
- Requirement, testcase, and defect tasks, which shows the number of such tasks divided into two groups: category and users.
If you have questions after reading this guide, do not hesitate to email us at hello@drivt.net to get a quick response.

DrivT is a web-based test management tool designed for efficient use by testers, developers, and team leads. It helps them manage, track, and organize software testing efforts. With DrivT, team members can create test cases, manage test runs, and track their results in a modern and clean web interface.
We wrote this guide to make your start in working with DrivT easier. Here you will learn the basics of test management, from creating projects and test running to evaluating real-time results. We highly recommend forwarding the guide to all of your team members to provide a common understanding of test processes.
After logging in to DrivT, the first page you always see is the Home Page. The home page provides an overview of recent projects, notifications on recent project activities, and your tasks.
Whenever you want to switch to another project, click on a project title in the upper left corner or return to the home page. To create a new project, click on New Project below the recent projects on the home page and follow further instructions.
After navigating to a project (click on a project title), you switch to the project view and land on the project’s overview page. Here you will find project details such as test cases, defects, requirements, and settings.
To switch to test cases, click on the icon Test cases below a project title on the project’s overview page. Here you should create test cases depending on requirements.
On this page, you can see four project elements before project details:
- Test cases, which shows the whole number of test cases and the number of test cases with open tasks.
- Test executions, which shows the number of test executions and their success rate in percentage.
- Recent test executions, which shows the number of recent test executions and their success rate in percentage.
- Top task types, which shows the main types of tasks your team is working on.
On the right side of project elements, you can see the increased or decreased percentage, which represents how the work on a project is going on after making the last changes (for example, Test Executions + 2,5%).
Below on the left side, you can see the list of active test cases. You can find the needed test cases by using a filter. Also, you can see when the last changes to test cases were made. For your convenience, we provide the test cases status with colors:
- Green – a test case is completed.
- Yellow – a test case is in progress.
By clicking on any of them, you can learn more about its content. A test case in DrivT consists of a project summary, dependencies, attachments, test steps, and test execution. A single tester can verify a test case in a short time, confirm a specific functionality, document a task, or verify project artifacts.
To minimize the clutter of test cases and storing of irrelevant items, there are labels in place. Adding the labels (tags) and applying them as a filter option, helps to speed up the search for the needed items or create a test run.
 Dependencies
To switch to Dependencies, click on the needed test case on the Test cases page. You can see Dependencies below a project summary. We recommend using labels or putting dependencies to make your work in DrivT more efficient and transparent. As dependencies, you can pin a link to a specific requirement or defect. Below you can see attachments to a test case. You can also upload or download the needed files.
To switch to Test steps, click on the needed test case on the Test cases page. You can see the Test Steps below attachments. To create a test step, click on the button Add a Test Step. Here you should provide a detailed description that will guide your test run.
Below you can find a Test Execution table which shows previous test executions, their dates, runners, and status (for example: Failed, Blocked, Success).
To switch to Test run, click on the needed test case on the Test cases page. To start a test run, click on the button Run in the upper right corner. Here a Tester can see defined test steps, make testing, mark successful tasks, or identify defects.
By default, there can be one of the three different statuses for each test:
- Success – A test is marked as Success when a tester could verify the test steps and all expected results.
- Failed – A test is marked as Failed when one of the defined test steps led to an error or when the expected results differ from the actual test results.
- Blocked – A test is marked as Blocked when it cannot be run currently due to some external dependency (like a bug that must be fixed before completing a test).
Once you complete a test run, you should close it from the test run’s edit page. You cannot edit or change tests of a closed run, which makes it ideal to archive test runs.
You can use Overview for analyzing particular metrics and infographics which will help you manage your testing more efficiently and make decisions to improve the quality of your software. Besides making it easier to execute test cases and get test results, the overview provides a simple way for all team members to track the progress of your project.
Here you can see several critical elements that represent your progress:
- Tickets, which shows the whole number of tickets and the number of tickets with open tasks.
- Open ticket breakdown (by priorities).
- Last finished tasks and the time when they were completed.
- Test coverage, which shows the average percentage of test coverage in the last 30 days.
- Test executions, which shows the number of test executions in the last 30 days.
- Requirement, testcase, and defect tasks, which shows the number of such tasks divided into two groups: category and users.
If you have questions after reading this guide, do not hesitate to email us at hello@drivt.net to get a quick response.